Trying out a custom 34-key split keyboard layout
I recently got to build two split keyboard setups, and I'd like to talk a bit about the layer system I'm experimenting with on the smaller, 34-key layout, because I think I'm onto something with it.
ferris_sweep-frank_noirot.json from my kit repo on GitHub, uploading it to config.qmk.fm and clicking Compile followed by Download Firmware.
The keyboard
I was fascinated by the work that Ben Vallack has been doing on his YouTube channel to pare down his keyboard layout to be as ergonomic and efficient as possible. Last year he walked through a layout system that he created for himself on the 34-key Ferris Sweep layout, whose PCB layout he also showed how to lightly modify.
I decided that the low ~$50 price for this setup combined with the potential big rewards after some experimentation made it a worthwhile investment. I had a struggle putting it together but after setting it aside for a few months I came back to it and got both sides working with the default keyboard layout[1].
I was immediately not that into it, because it seemed to disallow the kind of rolling that fast typing requires (Ben makes this point in his video as well), so I decided to have a go with creating my own.
Layout philosophy
I agree with Vallack's stated design goal for his layout of reducing "chording", where you have to hold a key down to enter layers. I've added the following principles for myself:
- Isolate keys with different tap/hold functions to the thumbs
- Prioritize writing prose unencumbered whenever possible
- Eliminate delay-based interactions
I really didn't want to introduce any delay-based holds at all into my layout. Vallack says they don't bother him, but I just can't accept throttling any of the speed if I can help it. I'm already not the fastest typist, so I want my keyboard to help me as much as I can.
Layout overview
On to the details of the layout itself. My layout has 6 layers total: 4 that are "tap-through" layers and two that operate as "peek-in" utility layers. The layers are arranged as follows:
- Prose writing
- Left utilities
- Right utilities
- Keyboard movement
- Mouse movement
- Functions and long number sequence input
The peek-in utility layers are activated by holding the right and left primary thumb key, respectively.
Layer 0: prose writing
At its most basic, this layer is focused on writing English prose in the way that is most comfortable for the user. All of the non-thumb keys are purely alphabetical and punctuation, so this layout will accept any letter arrangement without issue. I am sticking with QWERTY for the time being so I don't have to rewire my entire brain while learning this new layer system, but I would love to experiment with alternatives like Colemak or the ISRT layout that Vallack uses someday[2].
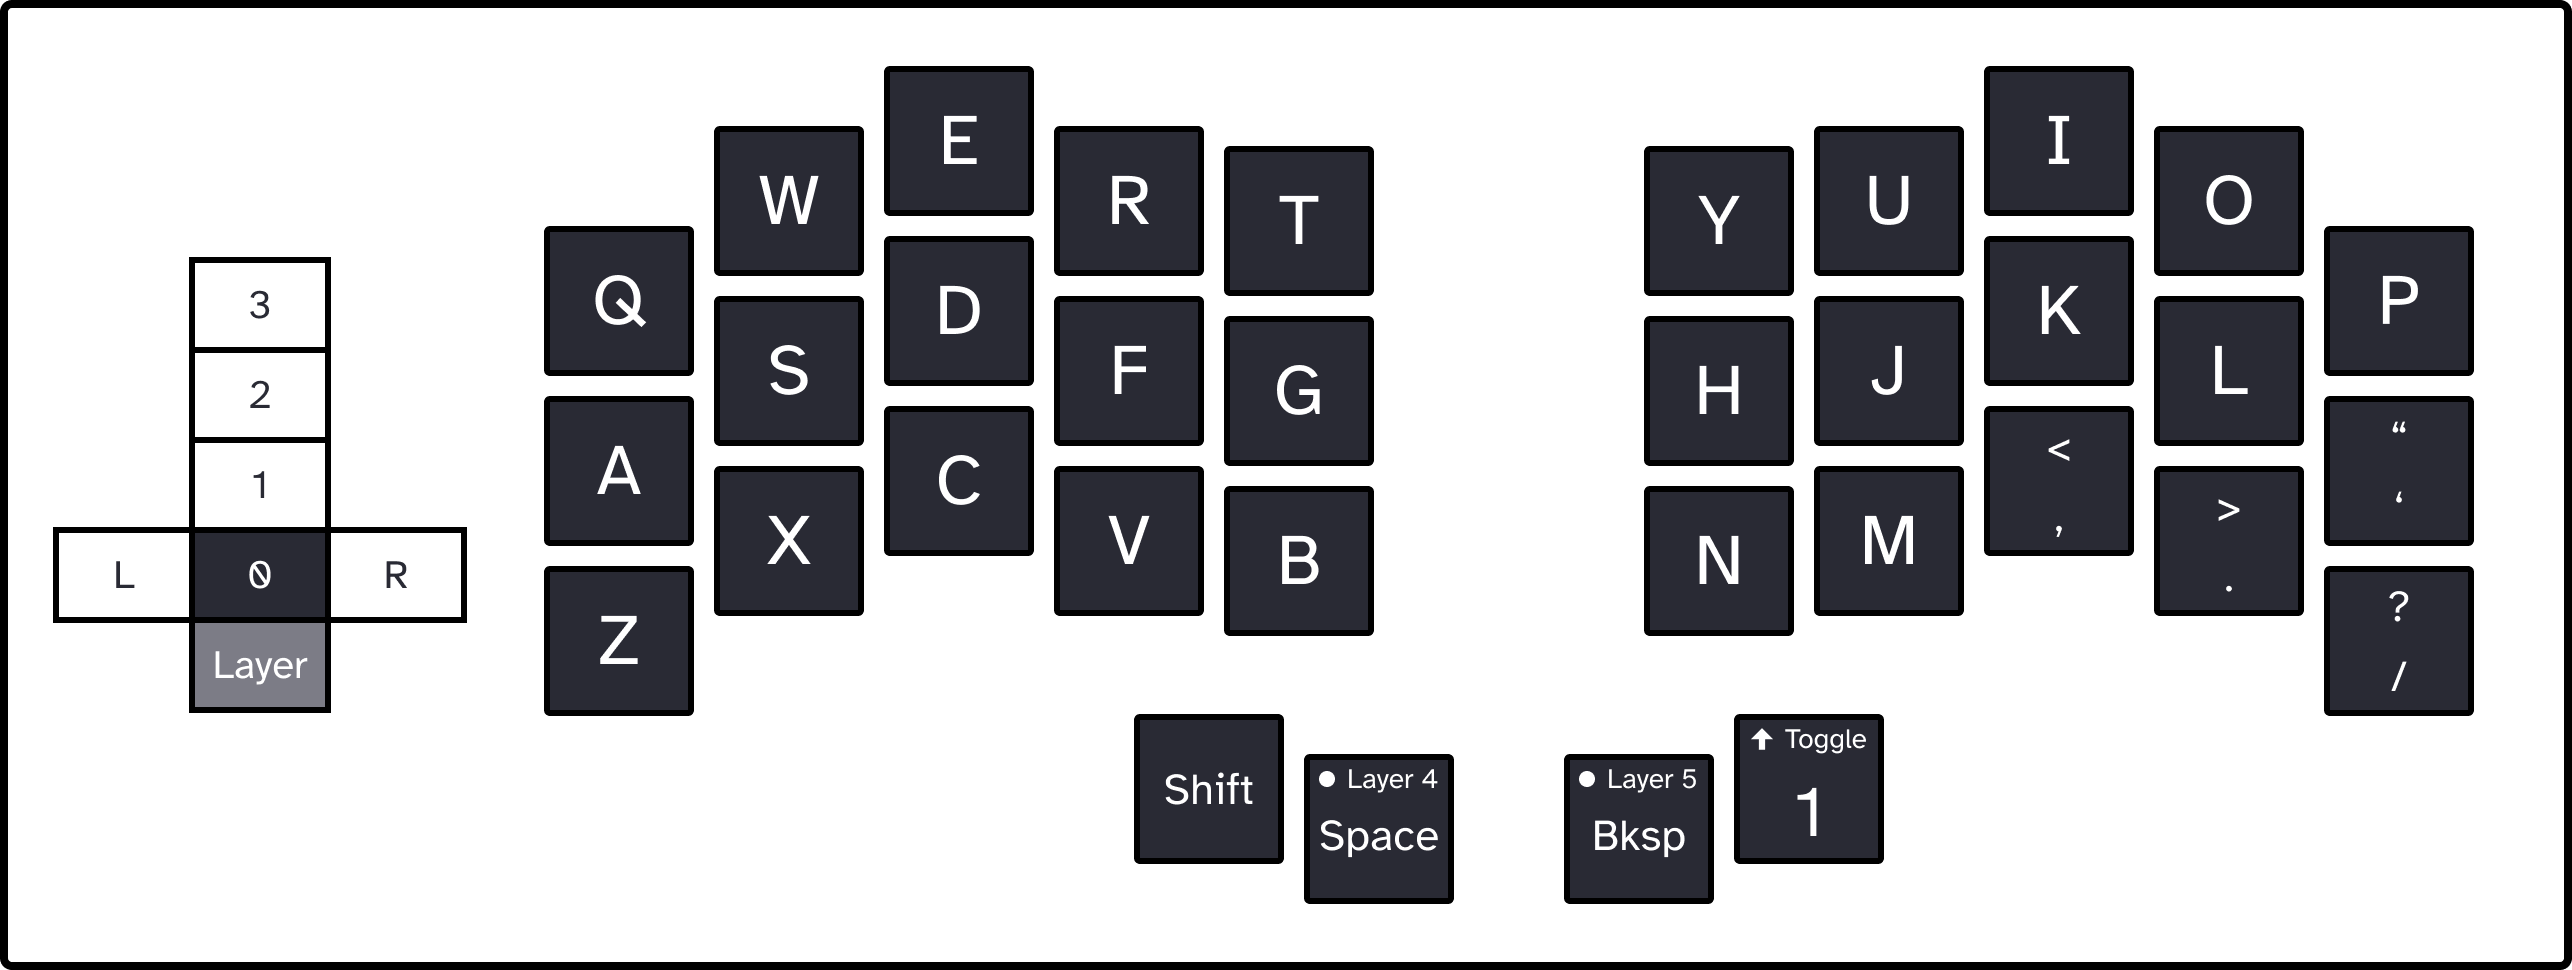
The only other thing of note is that I opted to demote the semicolon to one of my peek-in layers, and replaced it with the single/double quote key, because I've found that I write far more contractions than complex sentence clauses[3]. But I want to focus more on the four thumb cluster keys.
My inner left thumb key controls Shift and operates just like normal on layer 0, allowing me to write sentence case fairly naturally (although I am still tapping with my left pinky to try to shift occasionally still). Tapping my right inner thumb key enters Layer 1,
My home thumb positions (I rest my thumbs on the outer thumb keys) serve as Space and Backspace, respectively. I'm left-handed and I like the metaphor that my left thumb "pushes" the prose forward, while my right thumb pushes it back, but you could swap it if you tend to tap the spacebar with your right or prefer a "pulling" metaphor as a right-hander.
Holding either of my outer thumb keys opens a left or right utility layer, respectively. I've been calling them "peek-in" layers because they feel like two halves of the same utility layer that I'm getting to peer into one half at a time by holding a thumb. While I picture the tap-through layers as stacking above the keyboard, I picture each of these layers moving off sideways from the home layer.
In each of them is a top number row, coding punctuation, primary action keys like Tab and Enter, and modifier keys. An important part of these layers is that the hand opposite them simply passes through to whatever the normal Layer 0 key would be. This allows me to do the critical keyboard shortcuts by opening the peek-in layer opposite the letter I need for the shortcut: for example to open a new browser tab, I open Layer R to use the Command key in my right hand, and the passthrough allows me to access T with my right index.
Layer L
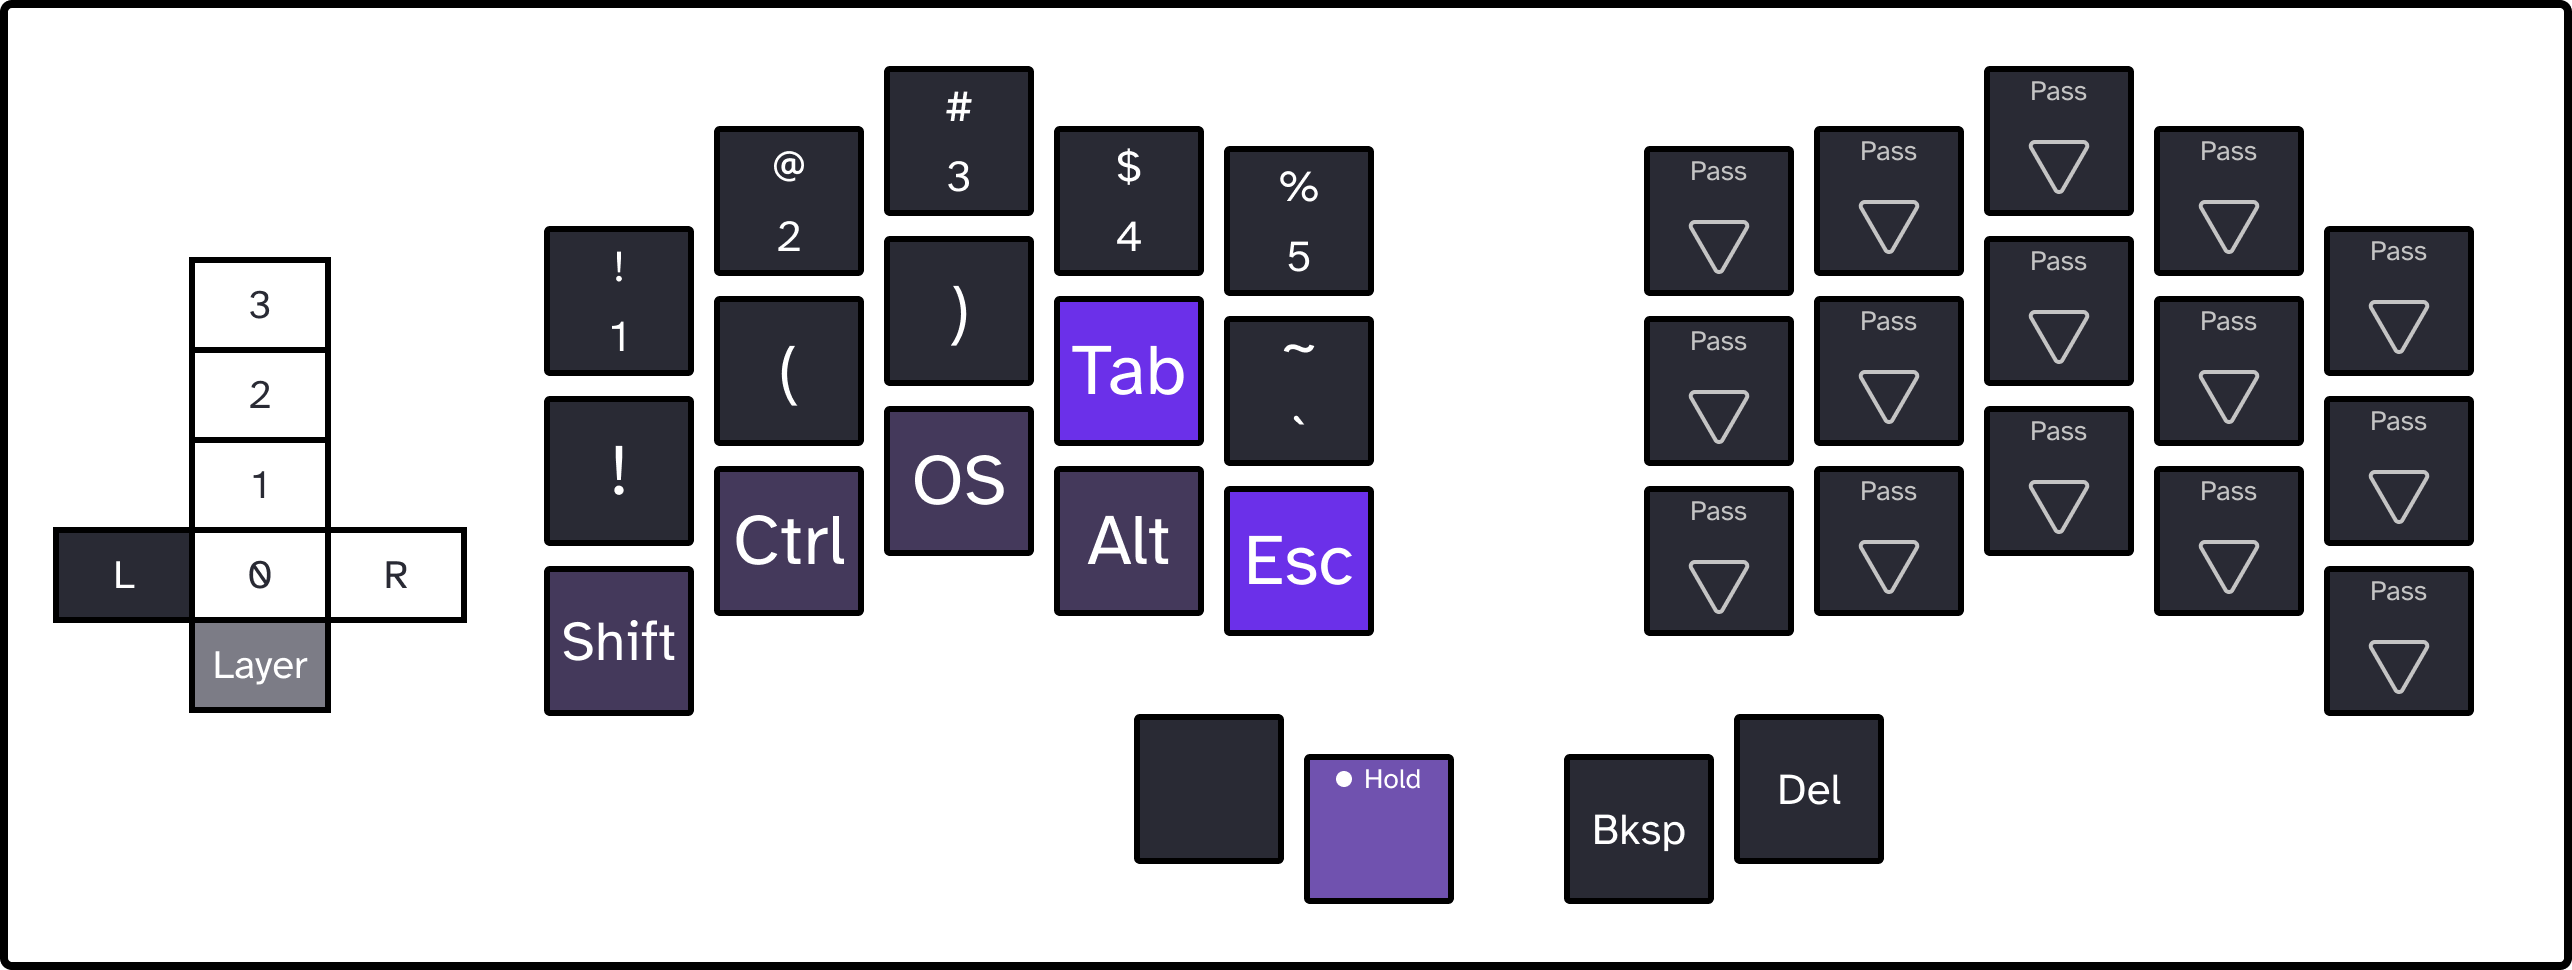
The left peek layer shows the pattern between the two well. While the outer left thumb is held down, the rest of the left hand becomes often-used keystrokes, actions, and modifiers. I swapped the order of the OS (Command on Mac, Win on Windows) key and the Alt key so that Command and Tab do not fall on the same finger, as I use it all the time to switch between applications on my Macbook. I followed this pattern anywhere modifiers occur in the layout, which made things easier to learn.
I followed the same reasoning in bringing the backtick key to my second index home row. Because of this placement next to tab, the command for switching between instances of an application (Command + Backtick) is right next to the one to switch between applications, and it feels great.
The exclamation point key may seem redundant with the Number 1 key above it, but since I need my pinky to hit the Shift key to access the top row's shifted versions, I was having to reach for the exclamation point with my ring finger across a column, which wasn't hard but felt like a bad practice.
Layer R
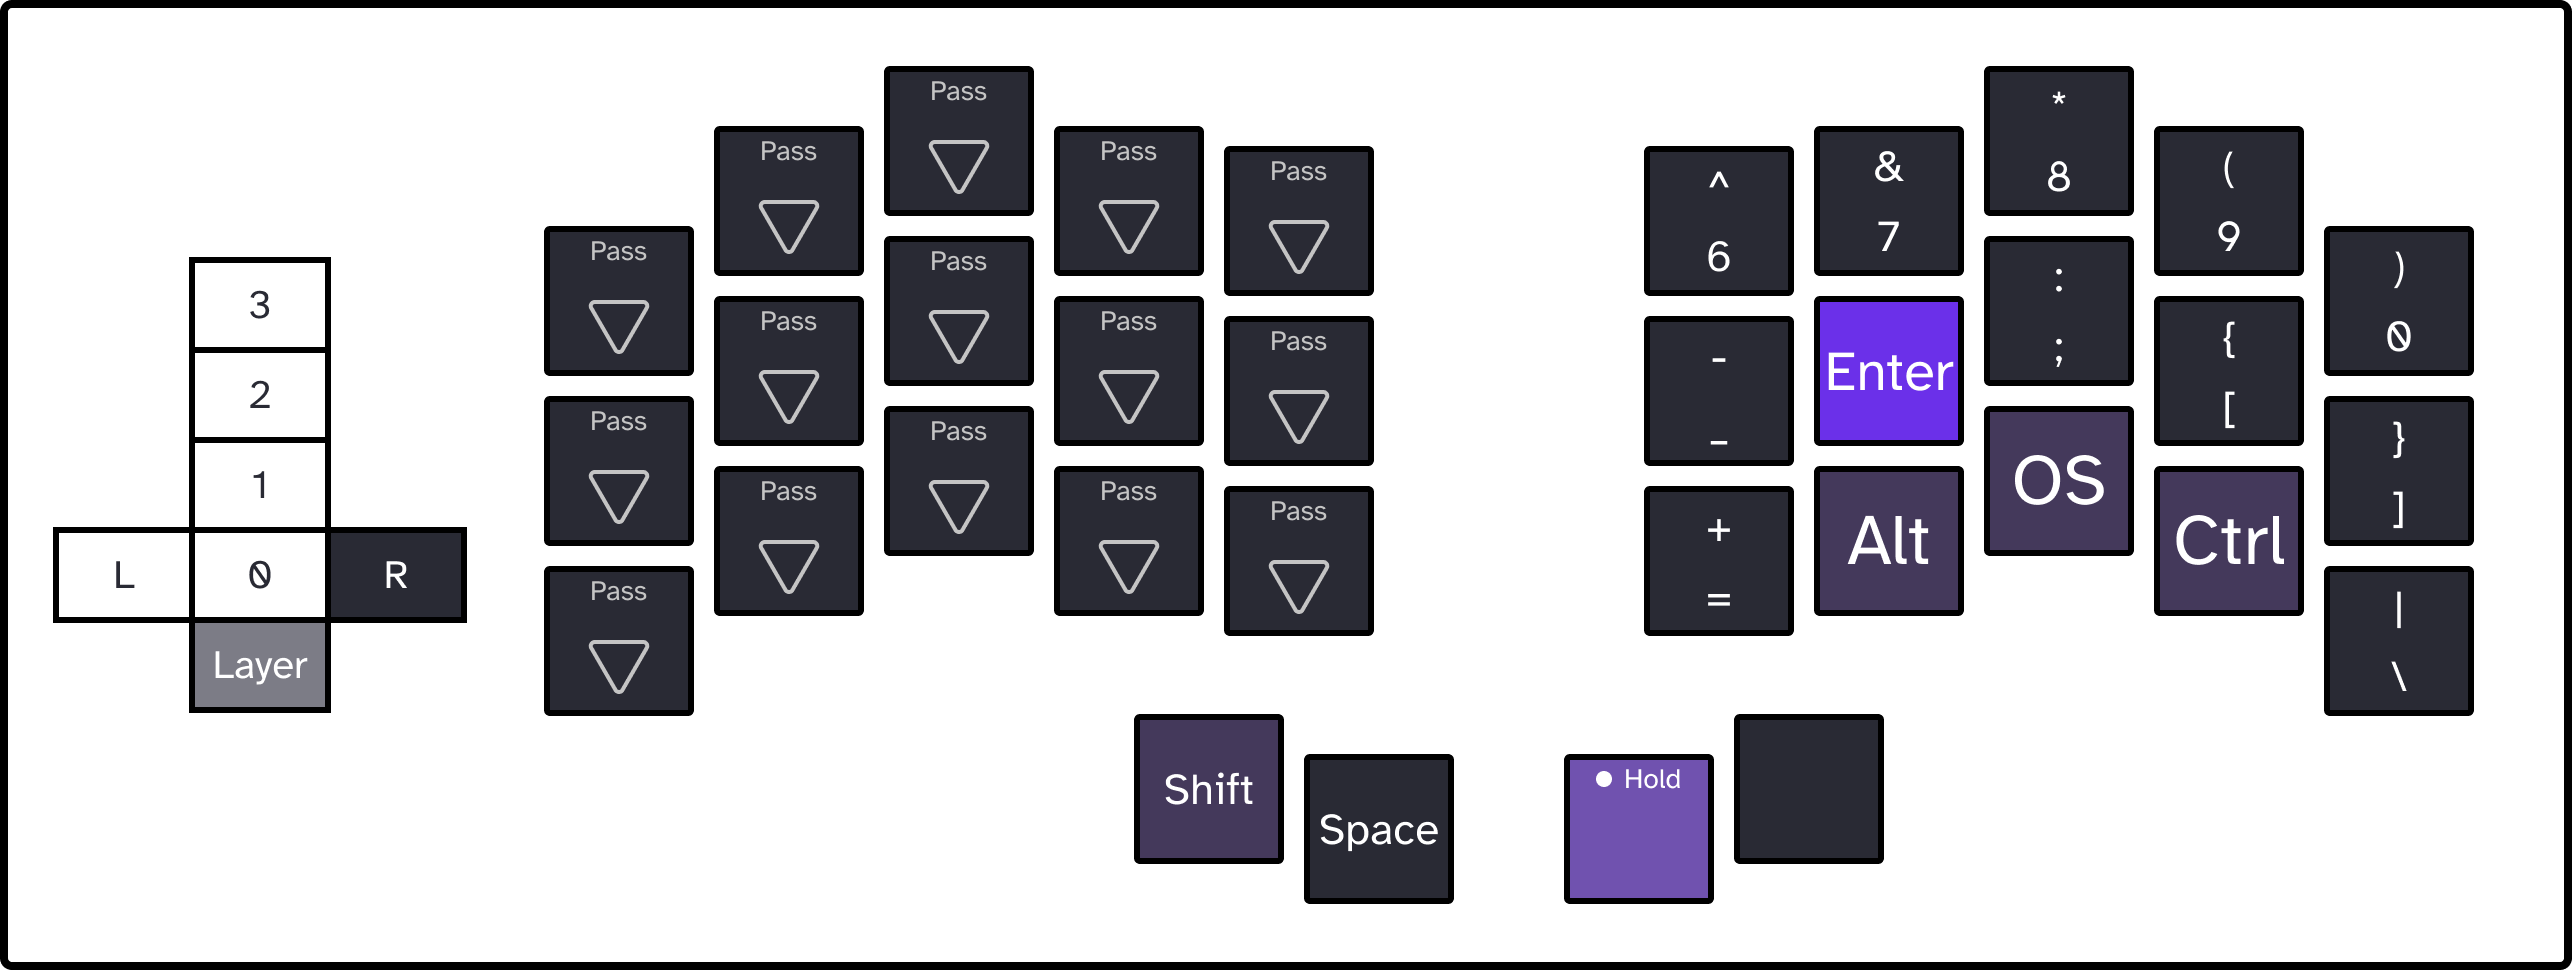
I had to compromise with the Shift key on the right peek layer, because I do use the pipe character a fair bit and I wanted to fit it into a peek layer key. So I opted to use the left inner thumb that is my usual Shift position to free up a key in my right. This asymmetry between the modifier keys takes some getting used to, but I feel like it's a justified idiosyncrasy.
I really enjoy the relationship between Tab and Enter that this layout highlights. Rattling off thumb + index finger on the home row of each hand makes these keys far more automatic to me than they are in a standard keyboard. It's always bothered me how pinky-heavy the standard keyboard is.
Layer 1: keyboard movement
After you've toggled into the first movement layer your right home row becomes all of the modifier keys, while the left hand's resting position becomes the arrow keys, with other quick line navigation keys directionally arranged around it.
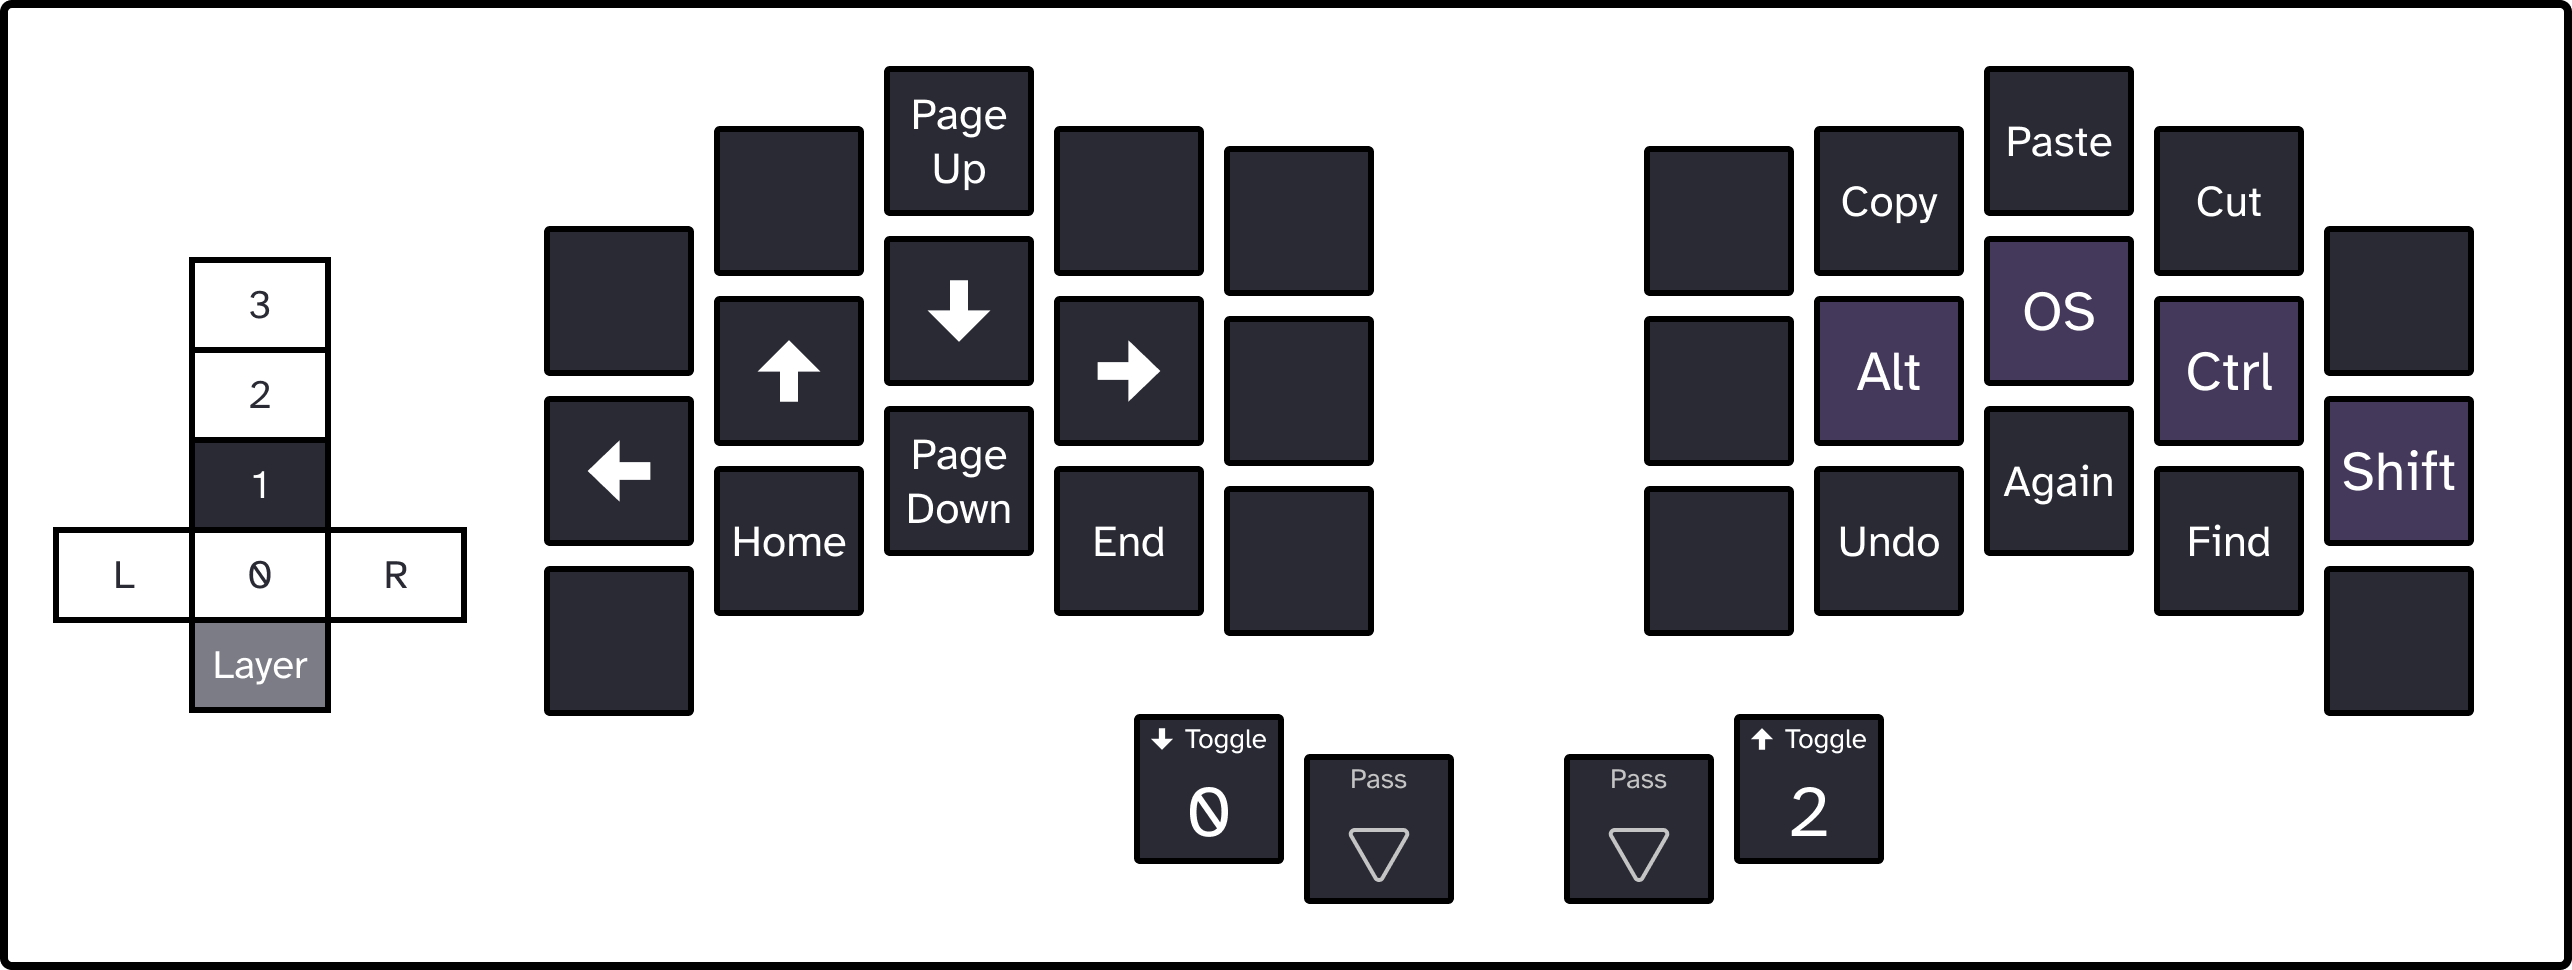
The left hand in this layer is lifted from the default Ferris Sweep layout in QMK and works well for me. I'm starting to love the feeling of selecting chunks of text with this. Hold down right pinky, then either hold right index or right middle and tap the arrow keys to quickly select lines and sentences out of text.
I haven't had success using the command keys Copy/Paste or Undo/Again that are clustered around the right hand, my Macbook just doesn't seem to recognize them, I may drop them or make them into macros so I know they'll work on my Mac, although it's a shame because Command + V is paste on Mac and Control + V is it on Windows, so I was hoping for a platform-agnostic solution. For now I'm just sticking to the real combinations using my peek-in layers.
Layer 2: mouse movement
This next layer up is for mouse movement and media controls. I make fairly frequent use of this layer, because there are a surprising and disappointing number of dialogues that are not keyboard accessible. If my head is in the right place, flipping layers costs me less mentally than reaching for the mouse.
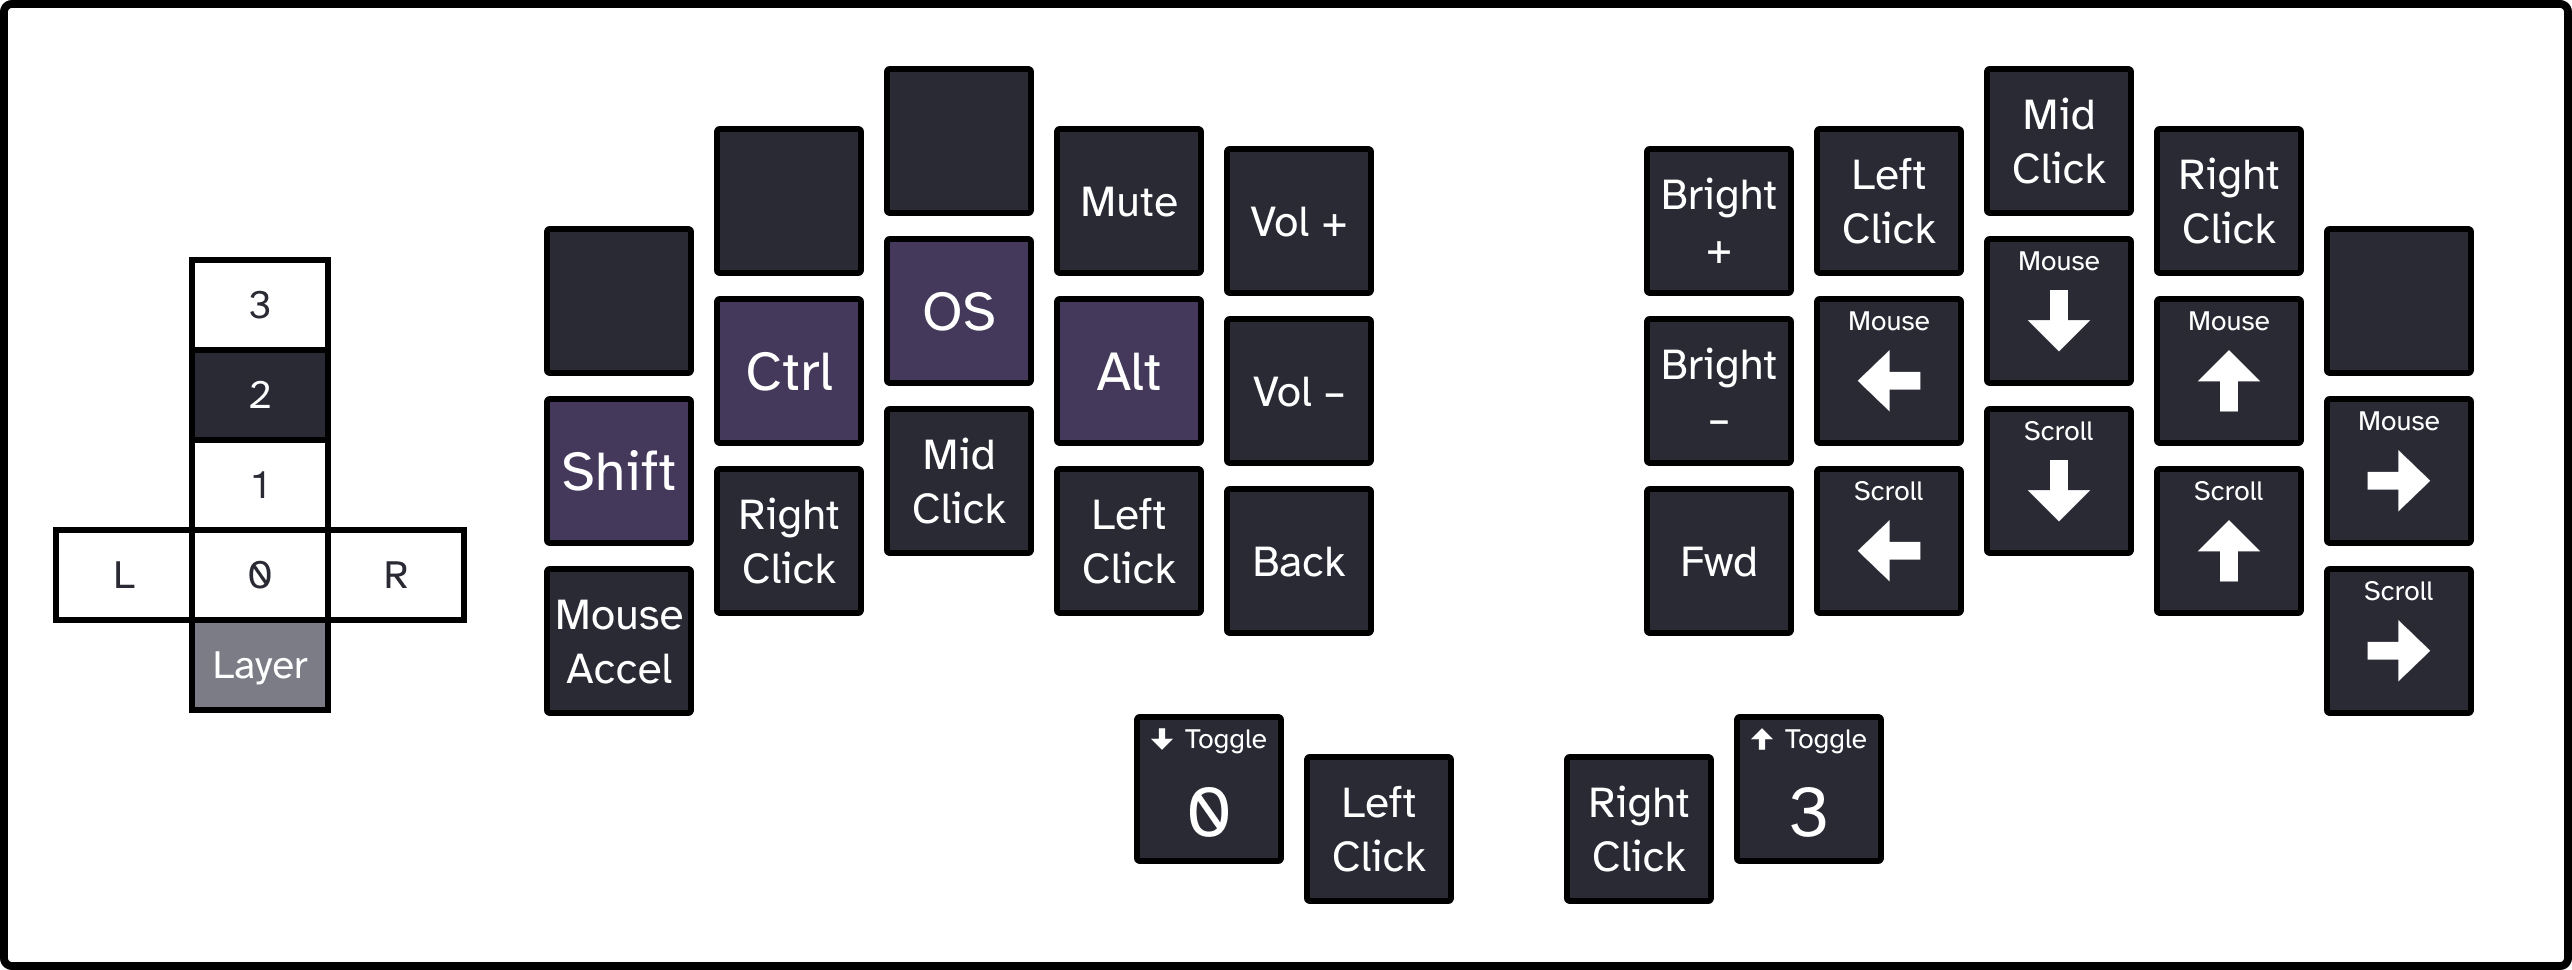
Some design notes on this layer:
- I enjoy the symmetry of flipping the modifier keys and the directional keys from the keyboard navigation layer one below. Switching between these layers feels like passing control of the computer between my two hands.
- I like the mental model of having scroll direction keys appear directly below the primary movement keys. This became automatic to me very quickly.
- I also appreciate having redundant mouse click keys for every hand arrangement. Though not space efficient, they mean I can take a sip with one hand and scroll or click with the other. One-handed actions become much more cumbersome when your keyboard's effective footprint is tripled in width, as is the case in ergonomic spacing between split keyboard haves.
- Again, like the copy buttons on the previous layer, I haven't gotten the Back and Fwd buttons to work on my Mac 😕.
Layer 3: functions
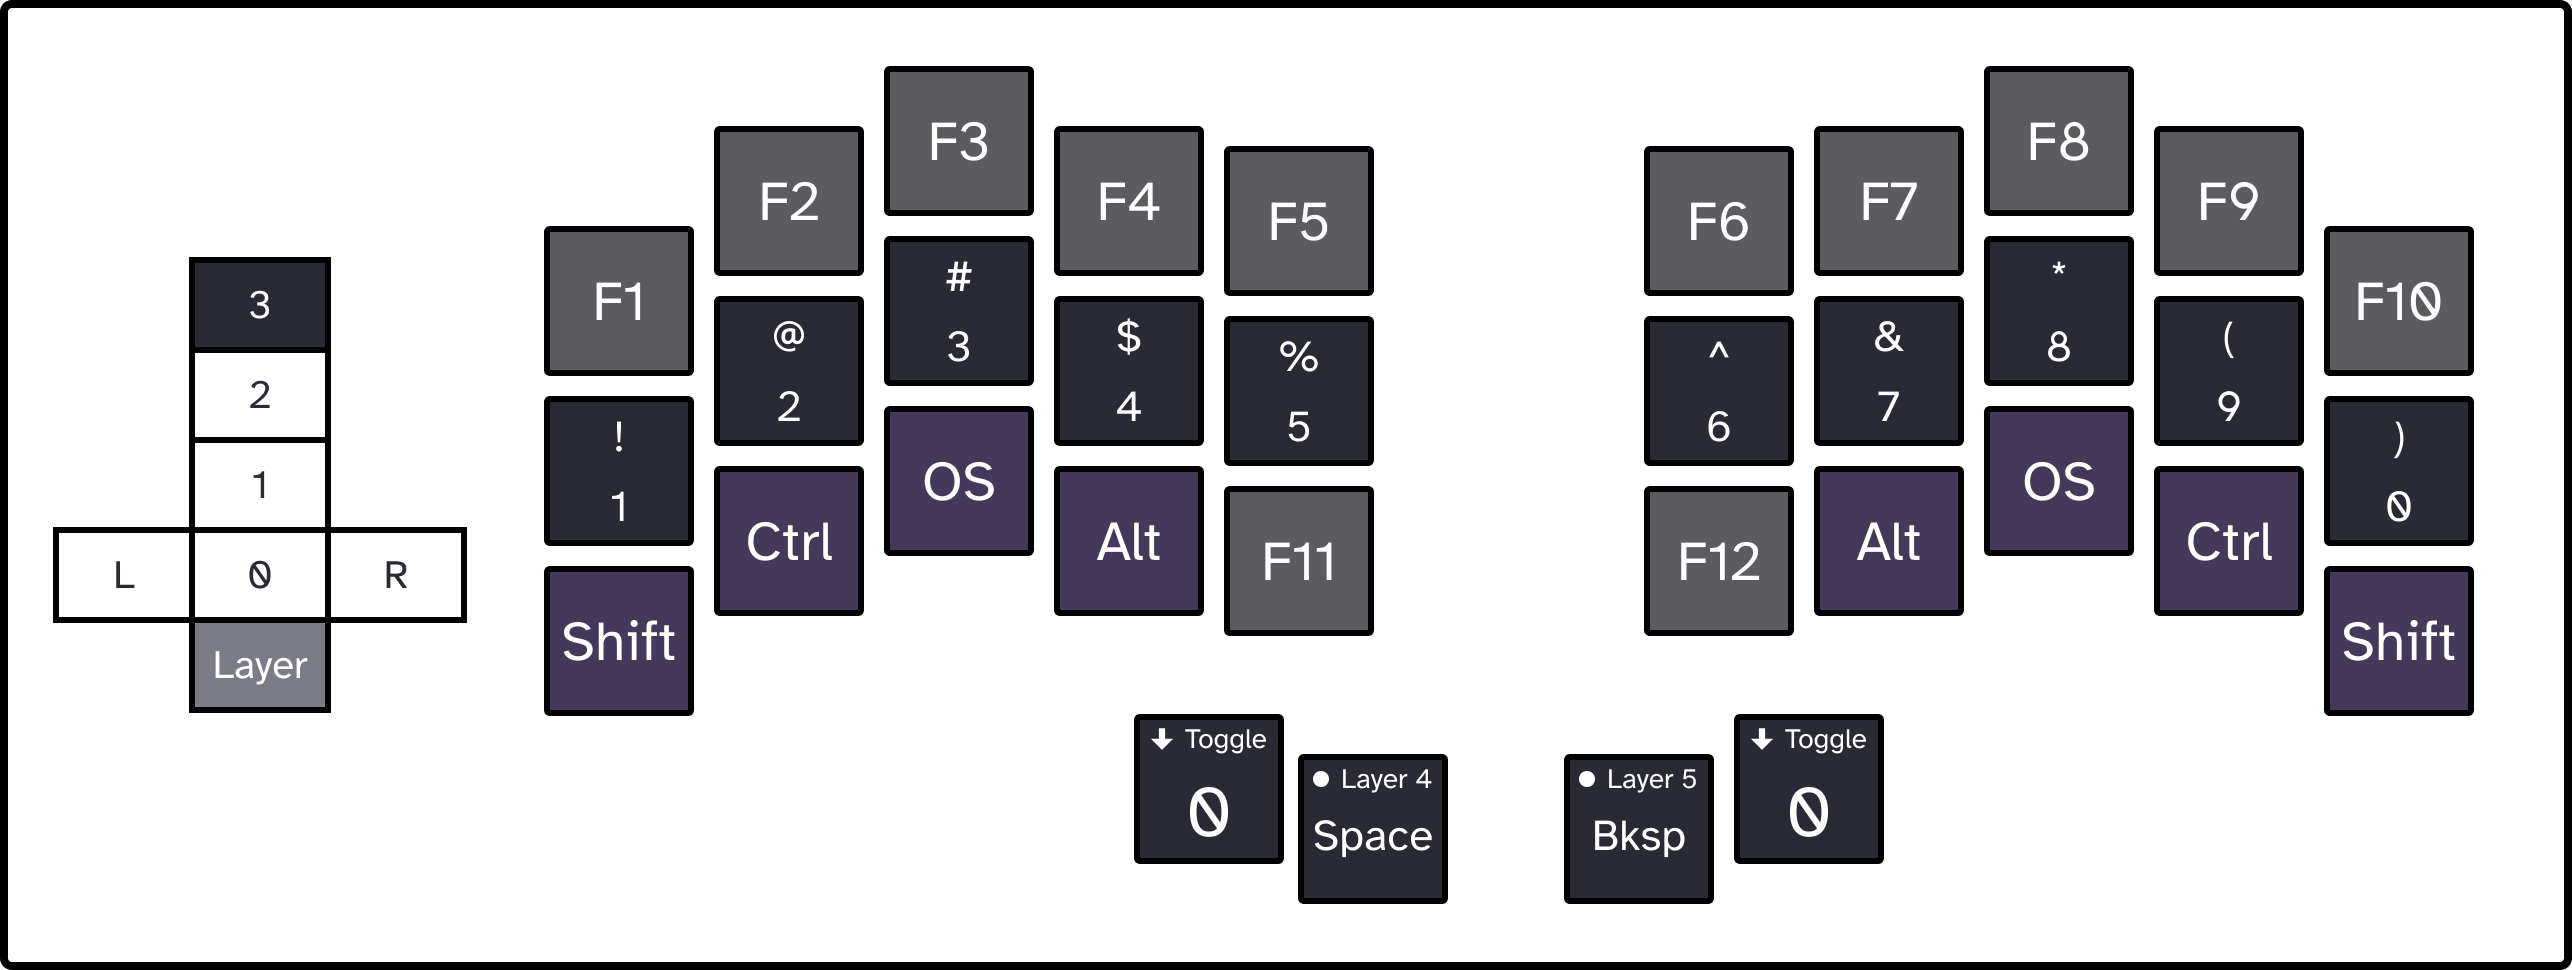
The final tap-through layer is pretty much the top row of a standard full keyboard. I will say that the ortholinear layout of the Ferris Sweep makes for a much more intuitive layout for no-look typing numbers and function keys. As a test, try tapping the 8 key without looking at your keyboard. Now try tapping the F8 key. Could you do it, and if you could did you strain to use the same finger? This layout makes that pretty painless.
I don't use this layer very often, because I have some mental friction triple-tapping the layer increment button to get to it. However I have enjoyed it for filling out credit card and phone number fields in forms. I think the "escape hatch" of both inner thumb makes this a nice layer to get out of.
Pain points
I have enjoyed using this layout off and on over the past year. I honestly think if I ever make a heavier, more rugged case for my keyboard halves I would get back to daily driving it.
Text movement was perhaps my biggest pain point in learning this layout. I've prided myself on being pretty quick on the Mac keyboard shortcuts for quickly deleting by word or line both forward and backward, and with using modifier keys with the arrows to quickly move around blocks of text. Having modifier keys behind a peek layer takes some real getting used to, and having to toggle to a separate layer to navigate text took me a second for my brain to switch. It took some time for that to become automatic.
However, the ergonomics of this layout are excellent, especially thanks to the modifier keys on the peek layers. This layout is nearly free of the horrible pain in my hand from that claw the Macbook forces you into for the modifier keys.
On my Macbook my left hand is frequently bunched up trying to hit modifier Command + Control + G to make a frame in Figma, a frequent maneuver made very painful. Technically I could hit the Command key with my right thumb, but the I find the right modifier row on the Macbook basically impossible to use.
Closing thoughts
All in all this layout has been a worthwhile endeavor. I'm already typing near my average speed of 70–80wpm on MonkeyType, and I wrote most of this post using it!
I also like a bunch of little details, like that on the second layer I have my left hand doing the navigating with my arrow keys on the home row, while if I tap to the third layer navigational control over the mouse in the right hand, jut like it would have if I were to reach for my real mouse.
What do you think of my layout? Have you built a Ferris Sweep? If you want to chat, as always, shoot me a message on social or find my email, and happy typing 🤙🏻
It took trying to rebuild my "buggy" right side board 3 times and setting it aside for a few months to realize that I had been soldering on the right side's PCB upside down each time 🤦🏻. I'm not very good at electronics. ↩︎
I actually did end up implementing a Colemak MK version that I daily drove for a while. I do enjoy it more than QWERTY, I've just been working mostly directly on my laptop lately, ↩︎
I also don't need semicolons to write JavaScript (fight me), although I may regret disrespecting the semicolon and colon when I try to write TS, CSS, or Rust, so stay tuned 😬. ↩︎